Solidity Compiler
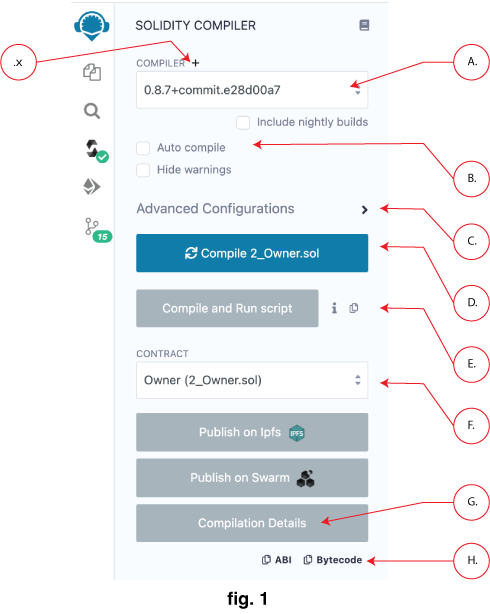
Clicking the Solidity icon in the icon panel brings you to the Solidity Compiler. The default view of the Solidity Compiler shows the basic configuration. To open the Advanced Configuration panel, click the Advanced Configuration button (C. in fig. 1). For details on advanced features - see below.
Solidity compiler basics
Selecting a contract to compile
To select a contract to compile, choose a file in the File Explorer. Or if there are several files open, make sure the one you want to compile is the active file in the Editor.
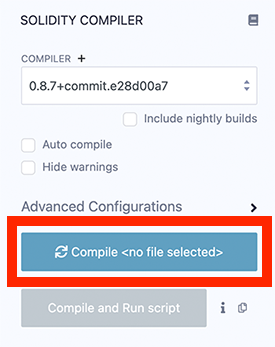
If there is not an active file in the editor or a file has not already been compiled, then the Solidity Compiler will look like this:
Triggering compilation
Compiling is triggered when you:
click the compile button (D. in fig. 1 below)
use the shortcut
control + s.right click on a file in the File Explorer and select the Compile option
Auto Compile
If the auto compile checkbox (B. in fig. 1 above) is checked, compilation will occur every few seconds (when the file is auto-saved) as well as when another file is selected. If a contract has a lot of dependencies, it can take a while to compile - so you use autocompilation at your discretion.
Solidity versions & Remix functionality
The compiler version is selected in the COMPILER dropdown list (A. in fig. 1 above).
You can compile (and deploy) contracts with versions of Solidity older than 0.4.12. However, the older compilers use a legacy AST — which we no longer support. Consequently, some plugins may not work and some functionality - e.g. source highlighting in the Editor may only be partially working.
Using the Contract selectbox
Because a Solidity file can include multiple contracts and because contracts can import other contracts, multiple contracts are often compiled. However, only 1 contract’s compilation details can be retrieved at a time.
To select the desired contract, use the Contract selectbox (F. in fig. 1). Forgetting to select the right contract is a common mistake - so remember to verify that the contract you want is selected.
Compilation Details and Publishing
Using the publish button, you can upload your contract to IPFS or Swarm (only non abstract contracts can be published to Swarm).
When publishing a contract that imports other contracts, the main contract and all of its imported contracts will be published - each to their own address.
Published data contains the contract’s metadata and the solidity source code.
After either Publish on IPFS or Publish on Swarm is clicked a modal will pop up. This modal contains the contract’s address as well as the addresses of the contracts that it imported and the address of the contract’s metadata.
When the “Compilation Details” button is clicked (G. in fig. 1), a modal opens displaying detailed information about the current selected contract.
If you just want to get the ABI or the Bytecode - click the appropriate button see H. in fig. 1.
Passive Contract Verification
When you publish your metadata to IPFS and deploy your code to the mainnet or a public testnet, the contract verification service Sourcify, will verify your contracts without you needing to do anything.
Compile and Run script
The Compile and Run script button (E. in fig. 1) is for compiling and then immediately running a script. It’s a time saver so that you can write some code, automatically run script that sets state of the contract - thus allowing you to quickly understand how the code is working. Learn more about Compile and Run.
Compilation Errors and Warning
Compilation Errors and Warning are displayed below the contract section. At each compilation, the static analysis tab builds a report.
It is important to address reported issues even if the compiler doesn’t complain. (more about static analysis)
Advanced compiler configurations
Clicking on Advanced Compiler Configurations will open this panel (M. in fig. 2 below).
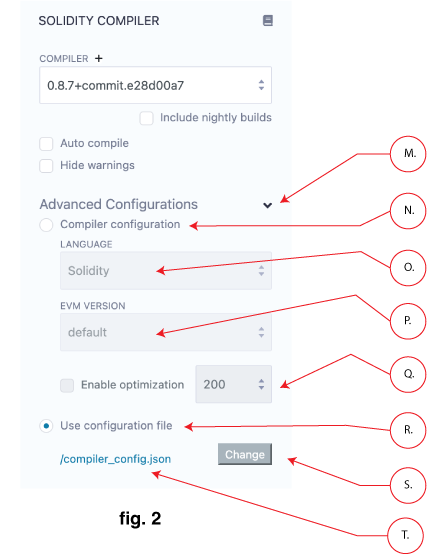
There is a radio button to choose whether to configure the compiler through the interface (N. in fig 2) or to use a JSON file for the configuration (R. in fig 2).
Solidity or Yul
Since the Solidity version 0.5.7, it is possible to compile Yul files. Please read the (solidity documentation about Yul) which contain some code examples.
You can use the language dropdown (O. in fig 2) to switch the language. This dropdown list is only available for versions greater than or equal to 0.5.7.
Select an EVM version
The EVM dropdown list (P. in fig 2) allows to compile code against a specific Ethereum hard fork.
The compiler default corresponds to the default hard fork used by a specific version.
To see the name of the hard fork used in the current compilation, click the “Compilation Details” button and in the Metadata section there will be a sub-section called settings. Open up the settings to see the EVM version’s name.
Enable optimization
According to the Solidity Docs, “the optimizer tries to simplify complicated expressions, which reduces both code size and execution cost, i.e., it can reduce gas needed for contract deployment as well as for external calls made to the contract.”
For recent versions of Solidity, it is recommended to enable optimization.
To learn more about optimization, (Q. in the fig 2) visit the Solidity docs on the optimizer.
To the right of the Enable optimization checkbox is the box to input the number of Optimization runs. The default value is 200.
You may ask — “What is the right number of runs for my contract?” And the Solidity docs say:
If you want the initial contract deployment to be cheaper and the later function executions to be more expensive, set it to –optimize-runs=1. If you expect many transactions and do not care for higher deployment cost and output size, set –optimize-runs to a high number.
To learn more about the optimization runs, visit the Solidity docs about Optimizer options.
JSON file for Compiler configuration
Selecting the radio button next to Use configuration file will let you set the configuration using a JSON file (T. in fig 2). When you switch to compile with a config file, a sample compiler config file is created. This file can be edited with all the available options.
Clicking the config file’s name will open it up in the Editor. To change the config file click the Change button. If you update the text box with a file name of a file that does not exist, a new file will be created containing the default file’s contents.
There is no error checking when using the .json file for configuration settings, so make sure your config file is correct.
Use a Custom Solidity Compiler
For those writing your own custom Solidity Compiler, you can import that by clicking the + button (X. in fig 1) to open a modal where you can input the URL of the compiler to be loaded.